Why is the X-Touch Compact Not a “Good” Controller For Logic Pro X?

People have purchased the X-Touch Compact assuming that it functions the same way that the X-Touch does, or that it can be extended by adding another one, or using it with the full X-Touch. It’s not true.

The X-Touch essentially is a “Logic Control” control surface — and has virtually complete documentation in the Logic Control Surfaces manual.

Yes, you can put the X-Touch Compact into “Mackie Control” mode and will do many things, but you will have to memorize the mappings etc. etc.

The extra $200 for the full X-Touch is more than worth it, if you can find a way to save up for it.

If your needs are simpler than full control of Logic from the controller you might find the X-Touch One a better compromise. It costs $200 less, and has many of the features of the full X-Touch, just fewer faders and V-Pots.

Note carefully ! The USB hub on the X-Touch Compact only operates when the controller is in USB mode. If you put it into “Mackie Control” mode you lose the ability to connect USB devices through the X-Touch to the Mac. Me, personally, I like being able to plug a MIDI keyboard into the USB connection and have it work. Your mileage may vary.

I just can’t see any reason to choose the less-than-functional middle-priced solution of an X-Touch Compact.
Set Default Region Parameters by Region/Folder — Logic Pro X keyboard command of the day

Logic Pro X keyboard command of the day. #LogicProX @StudioIntern1

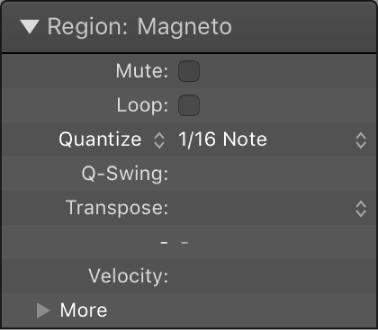
  Set Default Region Parameters by Region/Folder

This command is not specifically documented, but reasonable assumptions can be made by reading the “Edit Region Parameters” section of the manual. I think I prefer the way the subject matter was treated in the Logic 9 manual with the discussion of common parameters, then audio and MIDI specific parameters.

My assumption was the executing the command would cause the “MIDI Defaults” and “Audio Defaults” for regions to be set to the values of the selected region. This is what happens. I could clearly confuse myself by making odd settings be default for regions.

I finally understand why sometimes the Region Inspector has the name of the region set to “MIDI Defaults” or “Audio Defaults”, and how to get those parameters set up. NB the default settings do not get retained when Logic Pro is quit. Starting back up I find the default region parameters to be as expected — nothing odd.

Region inspector — Logic Pro X

You can view and edit region parameters in the Region inspector, located in the upper part of the inspector. When a single region is selected, the title bar of the Region inspector shows the region name; when multiple regions are selected, the title bar shows the number of selected regions.

Logic Pro 9 User Manual: Setting Region Parameters

The parameters displayed in the Inspector’s Region Parameter box depend on the region type selected in the Arrange area. Some parameters are:

⇧ SHIFT – ⌃ CONTROL – ⌥ OPTION – ⌘ COMMAND

Open/Close MIDI Insert 3 Plug-in Window of focused Track — Logic Pro X keyboard command of the day

Logic Pro X keyboard command of the day. #LogicProX @StudioIntern1

  Open/Close MIDI Insert 3 Plug-in Window of focused Track

Opens or closes (toggle) the window for MIDI insert plugin 3. There sure are a lot of these commands. Currently there can only be eight MIDI inserts, so we either have a hint of things to come, or someone wasn’t paying attention when they programmed the commands.

There is no documentation for these commands. All behaviors are learned by trial and error.

I need to remember that we can get very deeply involved in working with very small sets of tools for long hours. It would actually make sense to define a set of key commands for the detailed work. Save the set of commands. Load them in when the task comes up the requires it.

Think full-time MIDI editing and programming.

⇧ SHIFT – ⌃ CONTROL – ⌥ OPTION – ⌘ COMMAND

Command    Key Touch Bar
- Global Commands
Open/Close MIDI Insert 1 Plug-in Window of focused Track
Open/Close MIDI Insert 2 Plug-in Window of focused Track
Open/Close MIDI Insert 3 Plug-in Window of focused Track
Open/Close MIDI Insert 4 Plug-in Window of focused Track
Open/Close MIDI Insert 5 Plug-in Window of focused Track
Open/Close MIDI Insert 6 Plug-in Window of focused Track
Open/Close MIDI Insert 7 Plug-in Window of focused Track
Open/Close MIDI Insert 8 Plug-in Window of focused Track
Open/Close MIDI Insert 9 Plug-in Window of focused Track
Open/Close MIDI Insert 10 Plug-in Window of focused Track
Open/Close MIDI Insert 11 Plug-in Window of focused Track
Open/Close MIDI Insert 12 Plug-in Window of focused Track
Open/Close MIDI Insert 13 Plug-in Window of focused Track
Open/Close MIDI Insert 14 Plug-in Window of focused Track
Open/Close MIDI Insert 15 Plug-in Window of focused Track

1/32 Note 6 — Logic Pro X keyboard command of the day

Logic Pro X keyboard command of the day. #LogicProX @StudioIntern1

  1/32 Note  6

The Step Input Keyboard can be used to easily insert notes and rests into a MIDI region. The “dot”, “triplet”, and “sustain” buttons have an odd keyboard assignment.

The “Sustain Inserted Notes” command is defined as a Global command, not in the Step Editor — doesn’t seem to work to change the key definition — can’t get it to work. It appears that clicking the “Sustain Inserted Notes” button doubles the length of the most recently inserted note.

There is a 1/128th note command that doesn’t have a button on the keyboard. Unlikely to be necessary.

The definitions of the buttons appear if you hover the mouse over one of them for “a while”.

Use step input recording techniques — Logic Pro X

Insert notes using the Step Input keyboard

⇧ SHIFT – ⌃ CONTROL – ⌥ OPTION – ⌘ COMMAND

- Step Input Keyboard
Note “C” A
Note “C#” W
Note “D” S
Note “D#” E
Note “E” D
Note “F” F
Note “F#” T
Note “G” G
Note “G#” Y
Note “A” H
Note “A#” U
Note “B” J
Rest ˽
Next note will be sharp ⇧3
Next note will be flat ⇧B
Chord Mode `
Delete ⌃⌫
Step Backwards ←
Step Forward →
Octave 0
Octave 1
Octave 2
Octave 3
Octave 4
Octave 5
Octave 6
Octave - 2 ⇧Z
Octave - 1 Z
Octave + 1 X
Octave + 2 ⇧X
1/1 Note 1
1/2 Note 2
1/4 Note 3
1/8 Note 4
1/16 Note 5
1/32 Note 6
1/64 Note 7
1/128 Note 8
Triplets on/off 0
Dotted note values on/off 9
Velocity 16 (ppp) C
Velocity 32 (pp) V
Velocity 48 (p) B
Velocity 64 (mp) N
Velocity 80 (mf) M
Velocity 96 (f) ,
Velocity 112 (ff) .
Velocity 127 (fff) /
Quantize note starts On/Off Q

Plug-in Redo — Logic Pro X keyboard command of the day

Logic Pro X keyboard command of the day. #LogicProX @StudioIntern1

  Plug-in Redo

Plug-in windows have Undo and Redo buttons. They can be used to adjust changes. Plug-in changes are remembered, so you can make a number of changes and undo/redo for comparisons. It’s easy to assign key commands to plug-in undo and redo.

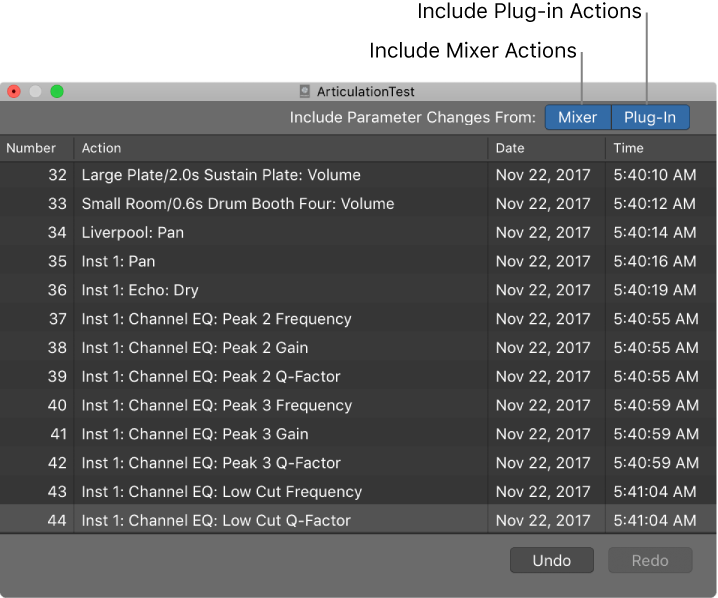
In newer versions of Logic mixer and plug-in changes can be kept in the undo list, so the normally available Undo (⌘Z) and Redo (⇧⌘Z) can be used if desired.

It might be interesting to provide separate plug-in and mixer undo/redo commands. Don’t know if it would really change the workflow in a significant way.

Currently have number of undo steps set to 150. That’s probably enough 😉

Undo and redo Mixer and plug-in adjustments — Logic Pro X

Using the Mixer Undo and Redo commands and the Undo History, you can undo and redo adjustments that you make to channel strips and plug-ins in the Mixer. Undoing or Redoing Mixer and plug-in adjustments is exactly like undoing adjustments in other areas of Logic Pro. The main difference is in the Undo History, where you can choose to include or remove changes from the Mixer and plug-ins from the Undo History action list. If you want to undo changes you make in the Mixer and to plug-ins, make sure that you have the buttons for Include Parameter Changes From for both Mixer and Plug-in turned on.

⇧ SHIFT – ⌃ CONTROL – ⌥ OPTION – ⌘ COMMAND