Paste to New Row ⌃⇧V — Logic Pro X keyboard command of the day

#LogicProX @StudioIntern1

  Paste to New Row   ⌃⇧V

Creates a new row in the Step Sequencer with the contents of the clipboard.

Edit Step Sequencer rows in Logic Pro — Apple Support

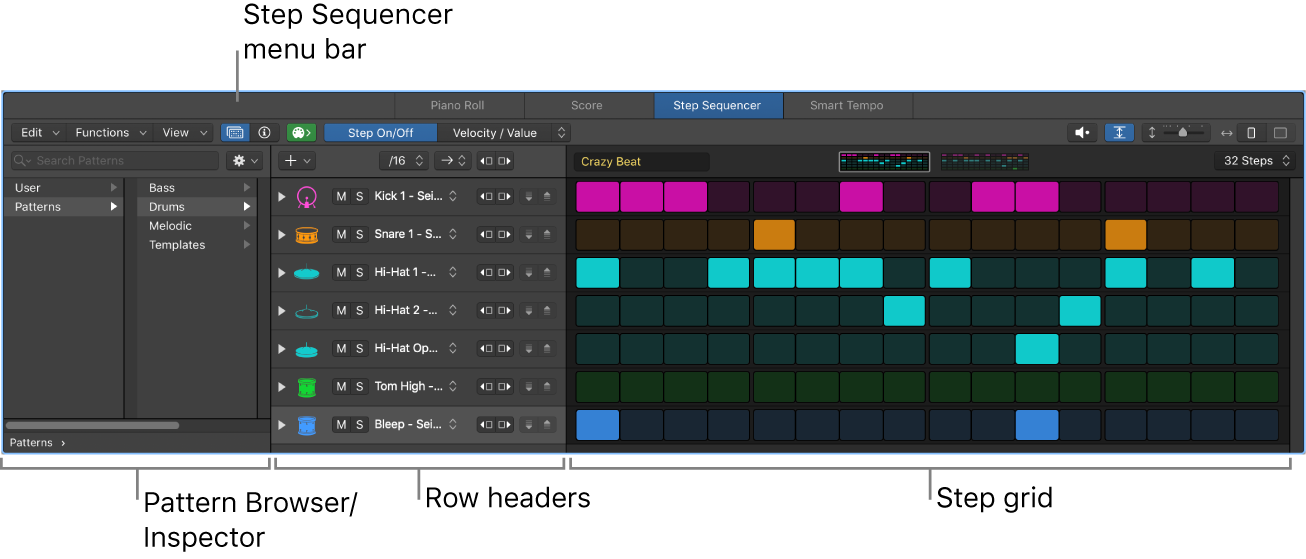
You can edit Step Sequencer rows in a variety of ways, including copying and pasting rows or row settings, duplicating a row with the next row assignment, changing the row assignment, resetting row values to a default setting, and deleting a row.

Logic Pro Step Sequencer overview — Apple Support

Step Sequencer is inspired by classic hardware step sequencers that have rows of configurable switches or knobs used to generate repeating musical patterns. In Step Sequencer, you create patterns by editing multifunctional steps in the step grid. Each row controls either a sound (which can be a drum kit piece, a note on an instrument, or a range of notes) or an automation parameter (letting you create automation changes over time in the pattern). Each step represents a definable length of musical time–by default, steps are of equal length, but you can change the length for individual rows or steps. You can adjust a wide range of parameters for individual steps, including velocity, pitch, gate time, and more; and edit pattern and row settings including pattern length, row loop start and end points, playback position, and rotation.

⇧ SHIFT – ⌃ CONTROL – ⌥ OPTION – ⌘ COMMAND

Live Loops: Geting started with Logic Pro X’s killer new feature — 9to5Mac

Live Loops: Geting started with Logic Pro X’s killer new feature — 9to5Mac

It takes Apple about 40-pages to explain what this feature is really capable of, but that’s way to much information to take in at once when you just want to get started making music. So we thought it would be a good idea to focus on some of the most important elements and concepts of the grid-based creative environment so we can all get down to business and learn the intricacies naturally along the way. Explaining every in and out of Live Loops could easily fill a 500+ page manual, if not more, but understanding the basics and letting the rest come naturally seems to be the best way for most creatives to come to grips with a completely new way of working.

Autoselect Automation Parameter in Read Mode — Logic Pro X keyboard command of the day

Automation curves displayed for a track

Logic Pro X keyboard command of the day. #LogicProX @StudioIntern1

  Autoselect Automation Parameter in Read Mode

New in LPX10.5. It looks like the only “easy” way to find information about Logic is to open the Help Viewer and search from there. Eventually I can find a link to the spot in the support documentation.

Show automation curves in Logic Pro — Apple Support

You can automatically show the automation curve of any parameter you click in a channel strip, plug-in editor, or track header on the main automation lane.

A copy/paste of the help information produces useless links to the Logic support site.

⇧ SHIFT – ⌃ CONTROL – ⌥ OPTION – ⌘ COMMAND

Automap using Root Note from Audio File Names — Logic Pro X keyboard command of the day

Logic Pro X keyboard command of the day. #LogicProX @StudioIntern1

  Automap using Root Note from Audio File Names

My first new 10.5 command. This is a Sampler command. It currently doesn’t look like I can put a link to the documentation here. Looks like I have to type the command into the Help menu and assume that one of the links that shows up will get me where I need to go…

Logic Pro Sampler Mapping pane menu bar

AutoMap using Root Note from Audio filenames: Selected zones are repositioned and extended horizontally to fill the entire key range without gaps between zones in accordance with root note data in the audio filename. If multiple selected zones have the same root note in the filename, they will be sorted by velocity, based on audio content loudness levels.

⇧ SHIFT  –  ⌃ CONTROL  –  ⌥ OPTION  –  ⌘ COMMAND