Zoom Vertical Out ⌘↑ — Logic Pro keyboard command of the day

  Zoom Vertical Out    ⌘↑

Reduce the vertical size of the display. In the Score Editor the entire page shrinks. In the Arrange window track/region height is reduced.

On the X-Touch press the “cursor” key (center of the direction arrows) and use the up-arrow.

None of the documentation describes the result of the action very well. Experimentation is the way here.

Scroll and zoom the Logic Pro Tracks area — Apple Support

In Logic Pro, drag the horizontal and vertical zoom sliders in the Tracks area menu bar. Drag the horizontal slider left to zoom out for a wider view, or drag it right to zoom in for a close-up view. Drag the vertical slider up for a wider view (more tracks), or drag it down for a close-up view (fewer tracks).

Why is the X-Touch Compact Not a “Good” Controller For Logic Pro X?

People have purchased the X-Touch Compact assuming that it functions the same way that the X-Touch does, or that it can be extended by adding another one, or using it with the full X-Touch. It’s not true.

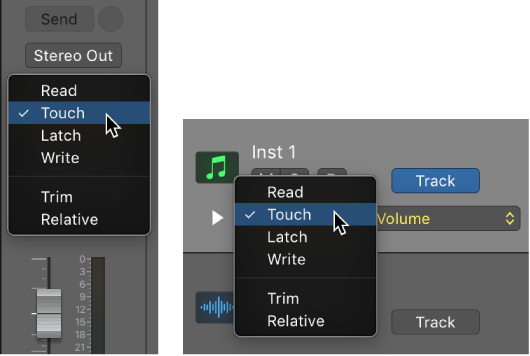
The X-Touch essentially is a “Logic Control” control surface — and has virtually complete documentation in the Logic Control Surfaces manual.

Yes, you can put the X-Touch Compact into “Mackie Control” mode and will do many things, but you will have to memorize the mappings etc. etc.

The extra $200 for the full X-Touch is more than worth it, if you can find a way to save up for it.

If your needs are simpler than full control of Logic from the controller you might find the X-Touch One a better compromise. It costs $200 less, and has many of the features of the full X-Touch, just fewer faders and V-Pots.

Note carefully ! The USB hub on the X-Touch Compact only operates when the controller is in USB mode. If you put it into “Mackie Control” mode you lose the ability to connect USB devices through the X-Touch to the Mac. Me, personally, I like being able to plug a MIDI keyboard into the USB connection and have it work. Your mileage may vary.

I just can’t see any reason to choose the less-than-functional middle-priced solution of an X-Touch Compact.

Set All Tracks to Automation Touch ⌃⇧⌘T — Logic Pro X keyboard command of the day

Logic Pro X keyboard command of the day. #LogicProX @StudioIntern1

  Set All Tracks to Automation Touch    ⌃⇧⌘T

My normal starting state is to have Read automation turned on. Whatever automation there is gets applied. When mixing the state should be changed to Touch — whatever is there is read until you change a parameter (move a fader) which is in effect until you stop movement at which point automation is again Read.

I would probably use this command at the start of a first pass for a mix letting me alter all of the tracks as I need to. As mixing progresses, or focus on certain sections becomes important it might be better to set all the tracks to Read and only enable Touch on the important tracks.

Choose automation modes — Logic Pro X

Automation modes determine how automation tracks are treated. Automation is either being read or being written. You can independently set the automation mode for each track. You can also trim automation values and record relative automation data.

The X-Touch (I use X-Touch and MCU and Logic Control interchangeably) has an entire section of buttons and modes dedicated to automation. It makes sense since the automation is often applied from a physical controller — so much easier than turning knobs with a mouse…

Mackie Control automation buttons — Control Surfaces Help

Hold down the OPTION button, then press one of the Automation buttons to assign the selected automation mode to all channels. When an automation mode has been assigned to all channels, the corresponding automation mode button LED illuminates whenever you hold down the OPTION button.

⇧ SHIFT – ⌃ CONTROL – ⌥ OPTION – ⌘ COMMAND

Add Mapping — Logic Pro X keyboard command of the day

Logic Pro X keyboard command of the day. #LogicProX @StudioIntern1

  Add Mapping

Smart Controls. Mapping parameters to Smart Controls is kind of tedious. The benefit is the Smart Controls can be used in Logic Remote, so control is possible while away from the computer. The controls are also mappable to the Control Surfaces.

Map screen controls to channel strip and plug-in parameters — Logic Pro X:

When Show Advanced Tools is selected in the Advanced preferences pane, you can map screen controls to channel strip and plug-in parameters for the selected track. Each screen control can be mapped to one or more channel strip or plug-in parameters for the selected track. Parameter mappings are saved with the patch.

⇧ SHIFT – ⌃ CONTROL – ⌥ OPTION – ⌘ COMMAND