Set All Tracks to Automation Touch ⌃⇧⌘T — Logic Pro X keyboard command of the day

Logic Pro X keyboard command of the day. #LogicProX @StudioIntern1

  Set All Tracks to Automation Touch    ⌃⇧⌘T

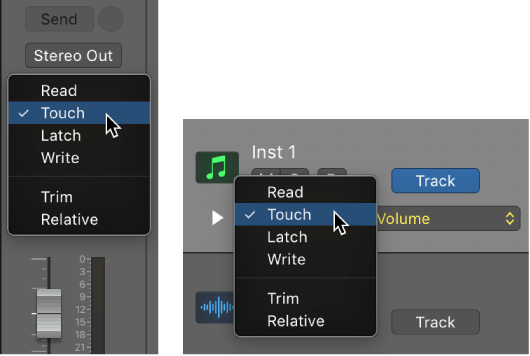
My normal starting state is to have Read automation turned on. Whatever automation there is gets applied. When mixing the state should be changed to Touch — whatever is there is read until you change a parameter (move a fader) which is in effect until you stop movement at which point automation is again Read.

I would probably use this command at the start of a first pass for a mix letting me alter all of the tracks as I need to. As mixing progresses, or focus on certain sections becomes important it might be better to set all the tracks to Read and only enable Touch on the important tracks.

Choose automation modes — Logic Pro X

Automation modes determine how automation tracks are treated. Automation is either being read or being written. You can independently set the automation mode for each track. You can also trim automation values and record relative automation data.

The X-Touch (I use X-Touch and MCU and Logic Control interchangeably) has an entire section of buttons and modes dedicated to automation. It makes sense since the automation is often applied from a physical controller — so much easier than turning knobs with a mouse…

Mackie Control automation buttons — Control Surfaces Help

Hold down the OPTION button, then press one of the Automation buttons to assign the selected automation mode to all channels. When an automation mode has been assigned to all channels, the corresponding automation mode button LED illuminates whenever you hold down the OPTION button.

⇧ SHIFT – ⌃ CONTROL – ⌥ OPTION – ⌘ COMMAND

Go to Marker Number 14 — Logic Pro X keyboard command of the day

Logic Pro X keyboard command of the day. #LogicProX @StudioIntern1

  Go to Marker Number 14

Another of the numbered marker commands. Not happening for me. I name my markers or use the forward/backward marker commands and buttons on the X-Touch.

Markers overview — Logic Pro X

There are several ways to create and edit markers in Logic Pro. You can view and edit markers in the following work areas:

Navigate using markers — Logic Pro X

You can navigate through your project using markers. This is useful when you want to quickly jump to, and edit, regions or events at a specific position in your project, for example.

⇧ SHIFT – ⌃ CONTROL – ⌥ OPTION – ⌘ COMMAND

Nudge Region/Event Position Left by SMPTE Bit — Logic Pro X keyboard command of the day

Logic Pro X keyboard command of the day. #LogicProX @StudioIntern1

  Nudge Region/Event Position Left by SMPTE Bit

One of the many nudge commands that can be used without having to set the Nudge Value before using. I would program keyboard commands for the nudge events, probably arrow keys with modifiers. Another useful possibility would be to program the keypad in an arrow pattern — 8 (up) 2 (down) 4 (left) 6 right.

Move regions in the Tracks area — Logic Pro X

You can move regions to a different point in the same track, or move them to another track of the same type. You can move an audio region to another audio track, for example, but not to a software instrument track, or vice versa. You can also move regions between open Tracks area windows, or between different open projects.

The X-Touch (MCU) has nudge features pre-defined. I would probably use this if I had the X-Touch in front of a display. Currently it is not feasible.

Mackie Control Nudge button overview — Control Surfaces Help

The NUDGE button allows you to move (nudge) selected audio or MIDI regions (or events) in Small, Large, or Temporary Nudge mode.

⇧ SHIFT – ⌃ CONTROL – ⌥ OPTION – ⌘ COMMAND

Command    Key Touch Bar
- Main Window Tracks and Various Editors
Nudge Region/Event Position Right by Nudge Value ⌥→
Nudge Region/Event Position Left by Nudge Value ⌥←
Nudge Region/Event Position Right by Tick
Nudge Region/Event Position Left by Tick
Nudge Region/Event Position Right by Division
Nudge Region/Event Position Left by Division
Nudge Region/Event Position Right by Beat
Nudge Region/Event Position Left by Beat
Nudge Region/Event Position Right by Bar
Nudge Region/Event Position Left by Bar
Nudge Region/Event Position Right by SMPTE Frame
Nudge Region/Event Position Left by SMPTE Frame
Nudge Region/Event Position Right by SMPTE Bit
Nudge Region/Event Position Left by SMPTE Bit
Nudge Region/Event Position Right by 1/2 SMPTE Frame
Nudge Region/Event Position Left by 1/2 SMPTE Frame
Nudge Region/Event Position Right by 5 SMPTE Frames
Nudge Region/Event Position Left by 5 SMPTE Frames
Nudge Region/Event Position Right by Sample
Nudge Region/Event Position Left by Sample
Nudge Region/Event Position Right by 1 ms
Nudge Region/Event Position Left by 1 ms
Nudge Region/Event Position Right by 10 ms
Nudge Region/Event Position Left by 10 ms
Nudge Region/Event Length Right by Nudge Value ⌥⇧→
Nudge Region/Event Length Left by Nudge Value ⌥⇧←
Nudge Region/Event Length Right by Tick
Nudge Region/Event Length Left by Tick
Nudge Region/Event Length Right by Division
Nudge Region/Event Length Left by Division
Nudge Region/Event Length Right by Beat
Nudge Region/Event Length Left by Beat
Nudge Region/Event Length Right by Bar
Nudge Region/Event Length Left by Bar
Nudge Region/Event Length Right by SMPTE Frame
Nudge Region/Event Length Left by SMPTE Frame
Nudge Region/Event Length Right by SMPTE Bit
Nudge Region/Event Length Left by SMPTE Bit
Nudge Region/Event Length Right by 1/2 SMPTE Frame
Nudge Region/Event Length Left by 1/2 SMPTE Frame
Nudge Region/Event Length Right by 5 SMPTE Frames
Nudge Region/Event Length Left by 5 SMPTE Frames
Nudge Region/Event Length Right by Sample
Nudge Region/Event Length Left by Sample
Nudge Region/Event Length Right by 1 ms
Nudge Region/Event Length Left by 1 ms
Nudge Region/Event Length Right by 10 ms
Nudge Region/Event Length Left by 10 ms

Toggle Current Track Automation Latch/Read ⌃⌘A — Logic Pro X keyboard command of the day

Logic Pro X keyboard command of the day. #LogicProX @StudioIntern1

  Toggle Current Track Automation Latch/Read    ⌃⌘A

Switch current track automation between Latch and Read. Changes the Automation label to appropriate value. Changes the Automation controls on MCU to correspond.

Choose automation modes — Logic Pro X

Automation modes determine how automation tracks are treated. Automation is either being read or being written. You can independently set the automation mode for each track. You can also trim automation values and record relative automation data.

⇧ SHIFT – ⌃ CONTROL – ⌥ OPTION – ⌘ COMMAND

- Global Commands
Toggle Current Track Automation Off/Read ⌃⌘O ⌃3⃣
Toggle Current Track Automation Touch/Read ⌃2⃣
Toggle Current Track Automation Latch/Read ⌃⌘A
Toggle Current Track Automation Write/Read
Toggle Current Track Automation Trim Mode
Toggle Current Track Automation Write Relative Mode
Toggle Move Track Automation with Regions Never/Always

- Views Showing Automation
Automation: Toggle Track/Region

Go to Previous Marker — Logic Pro X keyboard command of the day

Logic Pro X keyboard command of the day. #LogicProX @StudioIntern1

  Go to Previous Marker

Markers are handy things. I try to make it a point to create a marker track for a mix, and to place markers at points that stand out to me. During an initial listening pass I simply create a marker so I can return later. It is almost easy to create a marker and enter a bit of text to describe what is of interest, but attempting to type notes during the first listen can make me miss an important point.

Lots of ways to move around using markers. We can have different marker sets as well. I can make notes about a recording, mix it, and add a new marker set at each phase of the mix. A handy way to incorporate feedback in the project with a useful tool — a location in the project.

Navigating between markers is very easy on the X-Touch — press the MARKER button and use the FAST FWD or REWIND buttons.

Mackie Control Marker button overview — Control Surfaces Help:

Press the MARKER button to activate one of three marker modes: Small Marker mode, Large Marker mode, and Temporary Marker mode. You can use these modes to create or delete markers and jump to markers in your project.

I will be using markers to make notes as I work through “training” videos.

⇧ SHIFT – ⌃ CONTROL – ⌥ OPTION – ⌘ COMMAND

- Global Commands
Create Marker ⌥'
Create Marker without rounding ⌃⌥'
Create Marker for Selected Regions ⌥⇧'
Delete Marker ⌥⌫
Open Marker List ⌃⌥⇧8⃣
Open Marker Text
Set Locators by Marker and Enable Cycle ⌃⌥C
Set Locators by Previous Marker and Enable Cycle ⌃⌥,
Set Locators by Next Marker and Enable Cycle ⌃⌥.
Go to Previous Marker
Go to Next Marker
Go to Previous Marker And Set Locators ⌥,
Go to Next Marker And Set Locators ⌥.
Go to Marker Number… ⌥/
Rename Marker ⇧'
Go to Marker Number 1

Go to Marker Number 20
Create Arrangement Marker
Show/Hide Marker List
Create Scene Markers (Auto Range)
Remove Scene Markers (Auto Range)

- Views showing Time Ruler
Show/Hide Marker Track ⇧⌘K
Show/Hide Marker Track Only '