Nudge Region/Event Position Right by 1/2 SMPTE Frame — Logic Pro X keyboard command of the day

Logic Pro X keyboard command of the day. #LogicProX @StudioIntern1

  Nudge Region/Event Position Right by 1/2 SMPTE Frame

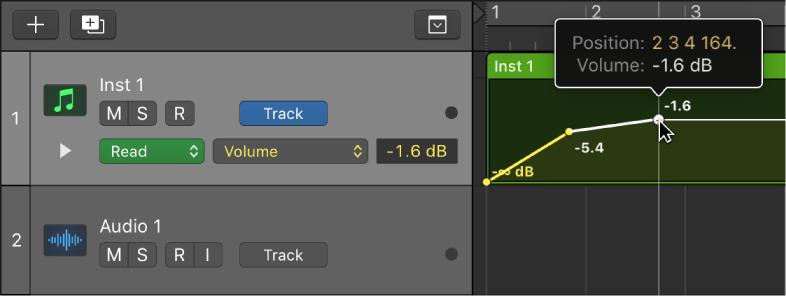
When that sound just has to line up with what is happening on the screen.

Editing audio to go along with a video. A skill that is probably far more useful now.

Move regions in the Tracks area — Logic Pro X:

You can also nudge regions (move them in small increments) left or right using key commands. To nudge regions, you first set the nudge value, then move selected regions by this value. Alternatively, you can nudge regions by a set value.

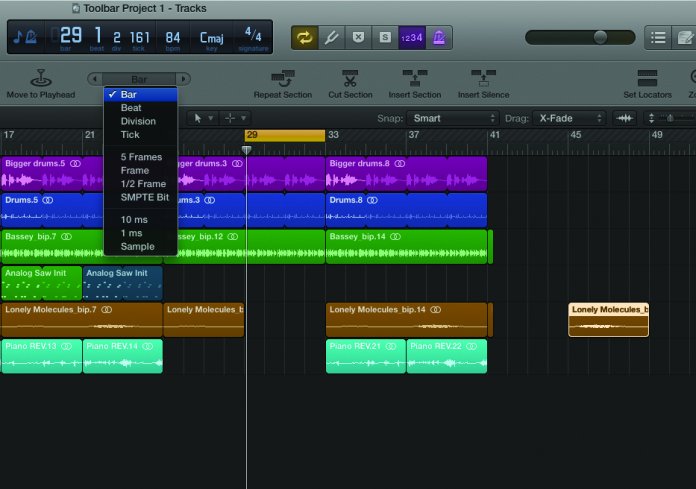
Logic Tutorial: Secrets of the Toolbar — MusicTech:

Cunningly hidden at the top of the interface, the Toolbar is Logic Pro X’s secret weapon for super-fast editing and arrangement, and a great way of extending a rough-and-ready demo into a developed composition.

Work with absolute time code — Logic Pro X:

The production process for video, film, or TV commercials is different from music production. Synchronization is always used, unlike in music production, where it is not always required. You need to work in absolute time: hours, minutes, seconds, and frames, rather than in bars and beats. Edits to the video, including changes to scene length, additional cuts, the use of slow or fast motion, and dialogue changes (or “redos”) are among the many situations that you will encounter when creating or editing a soundtrack.

⇧ SHIFT – ⌃ CONTROL – ⌥ OPTION – ⌘ COMMAND

Apply Default Crossfade ⌃⌥X — Logic Pro X keyboard command of the day

Logic Pro X keyboard command of the day. #LogicProX @StudioIntern1

  Apply Default Crossfade  ⌃⌥X

When editing it is important to create a crossfade at the boundary where the edit occurs. Left side fades out, right side fades in with the fades cross at the point where edit was made. It is quite possible for there to be an audible click or pop if the cross fade isn’t made.

I have”Fade Tool click zones” as well as “Marquee Tool click zones”. The Fade Tool click zones are the upper left and right corners of a region in editing windows. If you place the cursor between two regions that are adjacent the Fade Tool does a crossfade. Left corner, fade in. Right corner fade out.

The default crossfade time is set in the Audio preferences “Editing” tab. Twenty milliseconds.

I need to remember the “Equal Power” crossfade so I can use it when I “clip gain” a region. Get a better transition with differing levels.

Create fades — Logic Pro X:

You can fade in the beginning of audio regions, and fade out the end of audio regions (including audio Apple Loops).

Fades are only visible if you are zoomed in enough to see the waveform in the audio region. You can create a fade using either the Fade tool or the Fade In and Fade Out parameters in the Region inspector.

⇧ SHIFT – ⌃ CONTROL – ⌥ OPTION – ⌘ COMMAND

Apply Transform User Preset 8 to selected Events — Logic Pro X keyboard command of the day

Logic Pro X keyboard command of the day. #LogicProX @StudioIntern1

  Apply Transform User Preset  8 to selected Events

The MIDI Transform window can be opened from the Window menu, or by entering ‘⌘9’. There are 30 ‘Apply Transform User Preset … to selected Events’.

Use transform sets — Logic Pro X:

1. Choose Create New Transform Set from the Presets pop-up menu.

2. Set conditions and operations.

3. Select the “Hide unused parameters” checkbox. This helps to avoid changes to conditions and operations that aren’t required for (or may disturb) your transform set.

4. Choose New Parameter Set (Number) from the Presets pop-up menu. Enter a new name for your transform set.

This transform set now appears at the bottom of the Presets list in all MIDI Transform windows for this project. You should consider saving your user transform sets in one or more template projects. This way, they are always available to you in all future projects.

Tip: Renaming an existing transform set creates a new transform set that is identical to the original. The existing (source) transform set is retained.

⇧ SHIFT – ⌃ CONTROL – ⌥ OPTION – ⌘ COMMAND

Toggle writing Mute Automation in Write Mode — Logic Pro X keyboard command of the day

Logic Pro X keyboard command of the day. #LogicProX @StudioIntern1

  Toggle writing Mute Automation in Write Mode

This is not found in the help files, the iBook version of the manuals, or the PDF version of the manual. I have found interesting discussions about the topic for Reaper, Nuendo, ProTools, and a forum thread where someone was complaining about mute automation not working properly in “Touch” mode.

In the first case every time I get near “write” automation the warning signals flash about the destruction of all existing automation when in “Write” mode.

It never occurred to me that I could automate the mute button to silence a track while playing. My first resort would be to simply turn that part of the track into a region which I would then just remove. I can always get it back. It is visibly clear in the arrangement. Another way would be to create the region and set the region gain to minus infinity.

I guess I should try working a mixing session with things stemmed properly, put all the AUX tracks into “write” automation mode, and press play. Move the faders, change the panning push the mute button, etc.

It is certainly clear that if I did create mute automation, and it was not showing, I would wonder why some sound simply disappeared.

Automation overview — Logic Pro X:

Automation refers to recording, editing, and playing back the movements of faders, knobs, and switches. Using automation, you can create changes over time to volume, pan, and other settings. You can add automation to all track types.

⇧ SHIFT – ⌃ CONTROL – ⌥ OPTION – ⌘ COMMAND

Command    Key Touch Bar
- Global Commands
Toggle Current Track Automation Write/Read
Toggle Current Track Automation Write Relative Mode
Toggle writing Volume Automation in Write Mode
Toggle writing Pan Automation in Write Mode
Toggle writing Mute Automation in Write Mode
Toggle writing Send Levels Automation in Write Mode
Toggle writing Plug-in parameters Automation in Write Mode
Toggle writing Solo Automation in Write Mode

Toggle Hide Group 32 — Logic Pro X keyboard command of the day

Logic Pro X keyboard command of the day. #LogicProX @StudioIntern1

  Toggle Hide Group 32

Hmm. 32 groups. The keyboard commands for 1 through 9 are ⌃⇧1 to ⌃⇧9 .

The commands do what I expect. If there is a group numbered ‘n’ the command toggles the view of the tracks/channels. Hidden, but not like “Hide Track”.

Groups appear to be very useful. I should use them more. I fooled around with them a bit to try and change colors more easily, but they do so much more.

Groups are “mixer groups”. The overview helps us get started.

Groups overview
The Mixer groups feature is only available when Show Advanced Tools is selected in the Advanced preferences pane.

Prior to mixing, you may find it useful to define some logical channel strip groups. You could, for example, group all drum channel strips under one drum group. This would allow you to control the group meters (volume, pan, mute, solo, sends, and so on) using a single control, while still maintaining the relative parameter values of each channel strip.

Excerpt From: Apple Inc. “Logic Pro X User Guide.” iBooks.

⇧ SHIFT – ⌃ CONTROL – ⌥ OPTION – ⌘ COMMAND