Set Locators and Play — Logic Pro X keyboard command of the day

Logic Pro X keyboard command of the day. #LogicProX @StudioIntern1

  Set Locators and Play

Set the locators to the selection boundaries and play from the left locator. You can use the marquee tool to select a section, then use this command to play.

I think the more useful commands are “Set Rounded Locators and Cycle Play”, or even better for my mixing style “Set Locators by Next Marker and Enable Cycle ‘⌃⌥.’ control-option-period”.

Use the cycle area — Logic Pro X:

You can use the cycle area to repeatedly play a particular part of a project. The cycle area can be used for composing, practicing a part before recording, recording multiple takes, and other purposes.

⇧ SHIFT – ⌃ CONTROL – ⌥ OPTION – ⌘ COMMAND

Nudge Region/Event Position Left by Tick — Logic Pro X keyboard command of the day

Logic Pro X keyboard command of the day. #LogicProX @StudioIntern1

  Nudge Region/Event Position Left by Tick

This is a powerful tool when editing. The X-Touch has a nudge mode, so left/right movement of regions can be done from the controller as well. I am pleased when I find commands that are useful and that are implemented on my control surface. Makes me smile. Things I will use.

Move regions in the Tracks area — Logic Pro X:

Nudge regions by a set value
Use one of the following key commands:

Mackie Control Nudge button overview — Control Surfaces Help:

The NUDGE button allows you to move (nudge) selected audio or MIDI regions (or events) in Small, Large, or Temporary Nudge mode.

Large Nudge mode — Control Surfaces Help:

Hold down the SHIFT button, then press the NUDGE button to show eight functions on the LCD that are mapped to the corresponding V-Pot buttons. These functions allow you to move the selected region or events by various amounts or to a specific position. Press the NUDGE button a second time to turn off Large Nudge mode.

⇧ SHIFT – ⌃ CONTROL – ⌥ OPTION – ⌘ COMMAND

Go to Layer of Object — Logic Pro X keyboard command of the day

Logic Pro X keyboard command of the day. #LogicProX @StudioIntern1

  Go to Layer of Object

I am astonished. I can open as many MIDI Environment windows that I want. They all have the same name. The trick is to use multiple windows to show layers and work.

The command is found in the “Options” drop down menu.

⇧ SHIFT – ⌃ CONTROL – ⌥ OPTION – ⌘ COMMAND

Attach Symbol: Jazz 5 — Logic Pro X keyboard command of the day

Logic Pro X keyboard command of the day. #LogicProX @StudioIntern1

  Attach Symbol: Jazz 5

Used in the Score Editor. Only available as a key command (not in any menu). I previously posted a scoring command in one of the first entries — “Attach Symbol: Pizzicato” — which basically punted the explanation. I learn.

I have searched through the available documentation for Logic Pro X and can find nothing that explains what this command does, or what are the symbols labelled “Jazz”. Nothing. Crickets. I continued my search on the internet (where I discovered my lack of proper work, see above link) and found some interesting pointers. The first real clue came from the “Logic Express 7 — User Manual” in the discussion of the Part Box. Lots of words about palettes and floating palettes. Hmmm. Not happening in Logic Pro X.

Logic Express 7 - Jazz Symbols

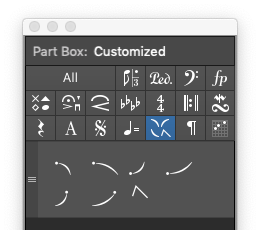
Note that there are 7 symbols, but only 6 commands. Odd.

I can now state that today’s command will attach the first Jazz symbol (highlighted in the picture) to the note(s) selected in the score window. Ta-da!

There is a decent description of the Part Box and how to use it in the Logic Pro 9 documentation as well. It is basically the same, with the same methods for use.

The Part Box changed dramatically in Logic Pro X! It doesn’t work the same way. Apparently all of the visual cues from Logic 9 documentation — screenshots of sections in the part box — were removed and replaced with some different textual description of what is where and what it does.

A first-time user of Logic will be utterly lost. No names for the palettes. The revenge of the icon driven user interface. Labels (at least show some text if I hover over it) could be provided.

I am grumpy. I need to “check my work” and make sure that the new, iBooks-only, version of the documentation is incomplete…back in a moment.

Wow…

Reset note attributes
You can reset all note attributes to their default settings if you decide you don’t want to keep your changes. When resetting note attributes, be aware that all symbols directly attached to notes (accents, fermatas, jazz symbols, and so on) are deleted.

Excerpt From: Apple Inc. “Logic Pro X User Guide.” Apple Books. https://itunes.apple.com/us/book/logic-pro-x-user-guide/id960809726?mt=11

Pop/Jazz (3/5/7-all): 5ths, 3rds, and 7ths are changed in this mode. It’s great for Pop and Jazz styles, especially when using sustained chords. It’s less suitable for polyphonic music, as the detuning of the natural 7th is significant. This mode should always be used with a Depth of 90% or 100%, as other values render the natural 7th acoustically ineffective.

Excerpt From: Apple Inc. “Logic Pro X User Guide.” Apple Books. https://itunes.apple.com/us/book/logic-pro-x-user-guide/id960809726?mt=11

Above you will see the three occurrences of the word “jazz” in the latest documentation. First reference to jazz symbols is in the bit about what gets deleted when you reset note attributes.

Kind of unfortunate. I will be keeping my old Logic documentation (whatever I can scour) so I might be able to take full command of the current version.

⇧ SHIFT – ⌃ CONTROL – ⌥ OPTION – ⌘ COMMAND

Command    Key Touch Bar
- Score Editor
Attach Symbol: Jazz 1
Attach Symbol: Jazz 2
Attach Symbol: Jazz 3
Attach Symbol: Jazz 4
Attach Symbol: Jazz 5
Attach Symbol: Jazz 6

Apply Transform User Preset 7 to selected Events — Logic Pro X keyboard command of the day

Logic Pro X keyboard command of the day. #LogicProX @StudioIntern1

  Apply Transform User Preset  7 to selected Events

The MIDI Transform window can be opened from the Window menu, or by entering ‘⌘9’. There are 30 ‘Apply Transform User Preset … to selected Events’.

Use transform sets — Logic Pro X:

1. Choose Create New Transform Set from the Presets pop-up menu.

2. Set conditions and operations.

3. Select the “Hide unused parameters” checkbox. This helps to avoid changes to conditions and operations that aren’t required for (or may disturb) your transform set.

4. Choose New Parameter Set (Number) from the Presets pop-up menu. Enter a new name for your transform set.

This transform set now appears at the bottom of the Presets list in all MIDI Transform windows for this project. You should consider saving your user transform sets in one or more template projects. This way, they are always available to you in all future projects.

Tip: Renaming an existing transform set creates a new transform set that is identical to the original. The existing (source) transform set is retained.

⇧ SHIFT – ⌃ CONTROL – ⌥ OPTION – ⌘ COMMAND