Toggle Channel Strip Format (mono/stereo) ⌃⇧S — Logic Pro X keyboard command of the day

Logic Pro X keyboard command of the day. #LogicProX @StudioIntern1

  Toggle Channel Strip Format (mono/stereo)    ⌃⇧S

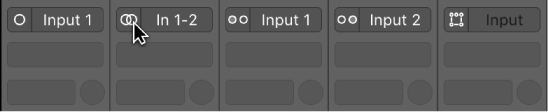
Change the selected channel strip(s) between mono and stereo. This can be changed using the pop-up menu to the left of the input selector. There is visual feedback in the meter strip which will show one or two meters depending on the channel strip format, and the input indicator changes between a single ring and the linked stereo rings.

It is possible to cause a channel strip to “become” mono or stereo by inserting a mono or stereo plugin. Normally you can only insert plugins of the proper type for mono and stereo (dual mono). Holding down the option key while choosing a plugin allows you to insert a mono plugin on a stereo channel. The input indicator does not change. The meters switch from two to one.

The format of any audio region on the track does not change. If you Bounce in Place the track the new audio will be in the format of the channel strip, so you can switch a stereo track to mono, then bounce in place to get a mono track. Interesting.

Set channel strip input formats — Logic Pro X

The channel input format determines the mono, stereo, or surround state of the channel strip. The symbol on the button indicates the current state as follows:

Set the channel strip output format — Logic Pro X

Logic Pro can automatically determine the output format of specific channel strip types. You can override the automatic choices by manually setting the output; otherwise, the channel strip output formats follow these rules:

⇧ SHIFT – ⌃ CONTROL – ⌥ OPTION – ⌘ COMMAND

Enharmonic Shift: b ⇧B — Logic Pro X keyboard command of the day

Logic Pro X keyboard command of the day. #LogicProX @StudioIntern1

  Enharmonic Shift: b    ⇧B

Change the selected note(s) to be displayed as flatted notes. Simple example — a D-sharp is changed to an E-flat.

A lot depends on the skill of the reader of the score and the willful intent of the producer of the score.

Change the display and position of accidentals — Logic Pro X

By default, the display of accidentals depends on the chosen key signature. Using note attributes, you can change flats to sharps, and vice versa. For information about setting the key signature, see Add key and time signature changes.

⇧ SHIFT – ⌃ CONTROL – ⌥ OPTION – ⌘ COMMAND

Previous Plug-in Setting or EXS Instrument — Logic Pro X keyboard command of the day

Logic Pro X keyboard command of the day. #LogicProX @StudioIntern1

  Previous Plug-in Setting or EXS Instrument

Change the settings to the previous setting in the list of settings. At the top of instrument and plugin windows there is a menu to select presets. Below that are left and right arrows which are the “Previous” and “Next” selectors.

I find the buttons convenient for sampling presets.

Work with plug-in settings — Logic Pro X

Choose the next or previous plug-in setting

⇧ SHIFT – ⌃ CONTROL – ⌥ OPTION – ⌘ COMMAND

Nudge Region/Event Position Right by Sample — Logic Pro X keyboard command of the day

Logic Pro X keyboard command of the day. #LogicProX @StudioIntern1

  Nudge Region/Event Position Right by Sample

Move the region one sample to the right. Incredibly fine-grained placement.

Move regions in the Tracks area — Logic Pro X

You can move regions to a different point in the same track, or move them to another track of the same type. You can move an audio region to another audio track, for example, but not to a software instrument track, or vice versa. You can also move regions between open Tracks area windows, or between different open projects.

⇧ SHIFT – ⌃ CONTROL – ⌥ OPTION – ⌘ COMMAND

Command    Key Touch Bar
- Main Window Tracks and Various Editors
Nudge Region/Event Position Right by Nudge Value ⌥→
Nudge Region/Event Position Right by Tick
Nudge Region/Event Position Right by Division
Nudge Region/Event Position Right by Beat
Nudge Region/Event Position Right by Bar
Nudge Region/Event Position Right by SMPTE Frame
Nudge Region/Event Position Right by SMPTE Bit
Nudge Region/Event Position Right by 1/2 SMPTE Frame
Nudge Region/Event Position Right by 5 SMPTE Frames
Nudge Region/Event Position Right by Sample
Nudge Region/Event Position Right by 1 ms
Nudge Region/Event Position Right by 10 ms

Set Region Start to Bar — Logic Pro X keyboard command of the day

Logic Pro X keyboard command of the day. #LogicProX @StudioIntern1

  Set Region Start to Bar

Moves the start of the MIDI region to the beginning of the bar. Only works with MIDI regions. Does not move the start forward in time, only to the beginning of the bar that the region starts in.

Once again I find complete sections of the user manual got removed from Logic Pro X. I am lucky to find answers in the Logic Pro 9 manuals, and fortunately those are still available online…why on earth did they remove the documentation for the tools? Cost of PDF files too much?

Logic Pro 9 User Manual: Resizing Regions

Use the MIDI > Set Region Start to Bar command (or use the corresponding key command) to round the start point of the selected MIDI region to the nearest bar.

⇧ SHIFT – ⌃ CONTROL – ⌥ OPTION – ⌘ COMMAND