Scrub Forward — Logic Pro X keyboard command of the day

Logic Pro X keyboard command of the day. #LogicProX @StudioIntern1

  Scrub Forward

Scrub the playhead forward. Assigning forward and backward to keys might help the process. Remembering how to get audio to play while scrubbing helps too.

My simple preference is to press the ‘SCRUB’ button on the X-Touch (MCU) and use the scroll wheel to move backward and forward.

Scrub the project — Logic Pro X

You can scrub a project to locate or listen to a sound at a particular point in time. When you scrub a project, you quickly audition it by moving the playhead across the Tracks area. The speed at which you move the playhead controls the playback speed. Scrubbing makes it easy to zero in on a particular drum beat or other audio event before cutting or editing a region.

⇧ SHIFT – ⌃ CONTROL – ⌥ OPTION – ⌘ COMMAND

Why is the X-Touch Compact Not a “Good” Controller For Logic Pro X?

People have purchased the X-Touch Compact assuming that it functions the same way that the X-Touch does, or that it can be extended by adding another one, or using it with the full X-Touch. It’s not true.

The X-Touch essentially is a “Logic Control” control surface — and has virtually complete documentation in the Logic Control Surfaces manual.

Yes, you can put the X-Touch Compact into “Mackie Control” mode and will do many things, but you will have to memorize the mappings etc. etc.

The extra $200 for the full X-Touch is more than worth it, if you can find a way to save up for it.

If your needs are simpler than full control of Logic from the controller you might find the X-Touch One a better compromise. It costs $200 less, and has many of the features of the full X-Touch, just fewer faders and V-Pots.

Note carefully ! The USB hub on the X-Touch Compact only operates when the controller is in USB mode. If you put it into “Mackie Control” mode you lose the ability to connect USB devices through the X-Touch to the Mac. Me, personally, I like being able to plug a MIDI keyboard into the USB connection and have it work. Your mileage may vary.

I just can’t see any reason to choose the less-than-functional middle-priced solution of an X-Touch Compact.

Nudge Position Right ⌃⌥⌘→ — Logic Pro X keyboard command of the day

Logic Pro X keyboard command of the day. #LogicProX @StudioIntern1

  Nudge Position Right    ⌃⌥⌘→

Nudge the current note/region to the right by the “nudge amount”.

The temporary Nudge mode of the X-Touch lets you choose the size of the nudge, just turn the appropriate V-Pot.

I’m not convinced that I have figured out all of the default nudge functions on the X-Touch — time for homework.

Move regions in the Tracks area — Logic Pro X:

You can move regions to a different point in the same track, or move them to another track of the same type. You can move an audio region to another audio track, for example, but not to a software instrument track, or vice versa. You can also move regions between open Tracks area windows, or between different open projects.

Side note — nudging regions from X-Touch? The answer is yes.

Mackie Control Nudge button overview — Control Surfaces Help:

The NUDGE button allows you to move (nudge) selected audio or MIDI regions (or events) in Small, Large, or Temporary Nudge mode.

⇧ SHIFT – ⌃ CONTROL – ⌥ OPTION – ⌘ COMMAND
Go to Next Marker And Set Locators ⌥. — Logic Pro X keyboard command of the day

Logic Pro X keyboard command of the day. #LogicProX @StudioIntern1

  Go to Next Marker And Set Locators ⌥.

Move to the next marker (you did make markers, didn’t you?) and set the locators. This makes it easy to move to the next section of the project and have the transport all ready for work.

I don’t use markers well enough. I should remember my piano training (Dr. Erlings) and do the 50,000 ft overview followed by finding the sections of the project. Set the markers to help make sense of things.

I need serious work in identifying song structure in the current world of music.

Dedicate some hours to working with markers — and the X-Touch!

⇧ SHIFT – ⌃ CONTROL – ⌥ OPTION – ⌘ COMMAND

Clear Overload Flag in Audio Channel Display ⌃⌥⌘C — Logic Pro X keyboard command of the day

Logic Pro X keyboard command of the day. #LogicProX @StudioIntern1

  Clear Overload Flag in Audio Channel Display   ⌃⌥⌘C

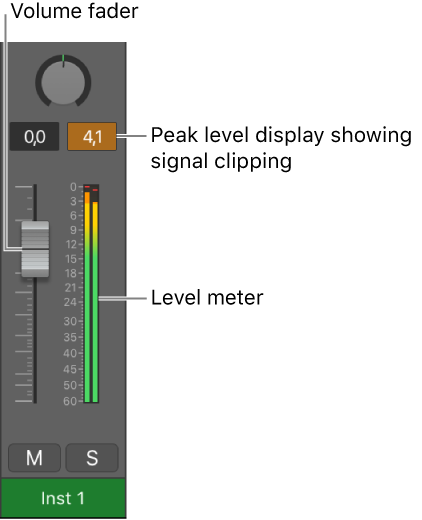
Clears the overload flag as well as clearing the peak level display. A red peak level indicates clipping in the output signal (24 or 16 bit) which results in distortion and lost signal. An orange peak level indicates clipping in the 32 bit domain, so it is not necessarily bad, but is certainly an indicator that there may be problems to be dealt with prior to output.

On the MCU/X-Touch the clip LED (red at top of meter) is cleared. This had not been the case in some versions of Logic Pro X, but it is functional as of version 10.4.8.

The overload indicator can be cleared from the X-Touch by pressing CONTROL and NAME/VALUE.

The overload indicator can be cleared by clicking on any of the peak level indicators in the display.

Peak level display and signal clipping — Logic Pro X

The peak level display is a numerical display located above the level meter. It updates during playback to show the peak level reached, after the entire signal has been played through to the end, and provides a guide that should be used to set the Volume fader.

Mackie Control display control buttons — Control Surfaces Help

Hold down the CONTROL button, then press the NAME/VALUE button to clear any overload (clipping) indicators in the Logic Pro Mixer and in the LCD if the Horizontal with Peak Hold mode is active.

⇧ SHIFT – ⌃ CONTROL – ⌥ OPTION – ⌘ COMMAND